2. Book a videoconference
Log in (or create a user account) so that you can use the the Janet videoconferencing booking system.
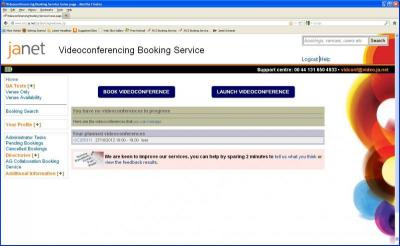
Figure 1. Janet videoconferencing home page
Prior to making a booking, the booking service users will need to know the email addresses of the attendees. If they have a venue registered in the booking system you will need to know the name of the one they will use (some organisations have several venues).
Booking a videoconference comprises three steps. At each step, the user will be asked to provide information:
- ‘Your conference details’ (conference title, start/end date, start/end time, conference coordinator’s name and contact details).
- ‘Conference venues and attendees’ (add conference venues from the users’ favourites list or registered venues list, or add a guest).
- ‘Confirm booking’ (Advanced settings may be configured in this step).
Each step is described in detail below.
Should any step be completed incorrectly, an error message will appear at the top of the page when users try to proceed to the next step. The error will be highlighted by a red triangle  . The correct or missing information must be filled in before proceeding.
During the booking process you can cancel your booking or save it for later.
2.1.Your Conference Details
By clicking on the Book Videoconference button shlown in figure 1, users will be taken to the ‘Your conference details’ page (Figure 2).
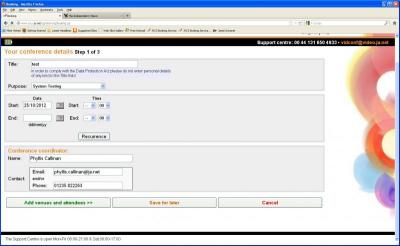
Figure 2: Book a videoconference Step 1
- Title: to enter a title, users need to click anywhere in the text box so the words ‘ Enter a meaningful name for this conference ’ are highlighted; by typing in a title this text will be overwritten. A title should accurately describe what the meeting is about – e.g. Budget Review meeting.
- Purpose: to choose a purpose for a conference, users need to click on the arrow to the right of the box entitled ‘ Select Purpose ’. The required purpose may then be selected by scrolling down the list that appears, highlighting the correct option and clicking on it. This field needs to be populated for reporting and to enable local venue administrators to ensure studios are set up for the required purpose.
- Start date/end date: to select the correct date, users may click on the small calendar next to the blank date space; this will display 3 months in advance. By clicking on the correct day, it will be entered into the booking form. An end date is automatically filled in for the same day as the start date. This may be changed if necessary by repeating the procedure above.
- Start time/end time: to choose a start time, users may click on the downpointing arrows to the right of the box entitled ‘Start time’. Hours and minutes can be chosen by clicking on each downpointing arrow and making a choice from the lists that appear. A list of hours of the day will appear in 24hour format, starting at 09:00 (hours between 01:00 and 08:00 appear at the end of the list after midnight). Minutes of the day are displayed at five minute intervals. The process needs to be repeated to select an end time.
- Recurrence: allows users to book a series of daily, weekly or monthly recurring videoconferences (Figure 3). Once conferences have been booked, it is possible to open an individual conference or the series of conferences for editing.
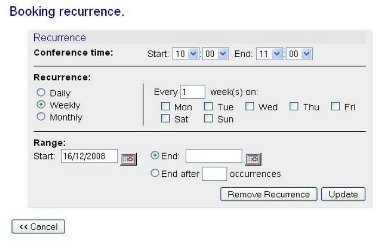
Figure 3: Recurrent bookings
- Conference coordinator: a conference coordinator is the person Janet Videoconferencing Operations staff should contact in case of any administrative queries. The conference coordinator does not have to be the conference booker or a technician. However, they should know who is attending, conference length, etc. Enter the following information:
- Name: users should click anywhere in the text box so that the words ‘ The chairperson/event coordinator/booker etc ’ are highlighted. Typing in a name will overwrite this text.
- Contact: users need to enter an email address and/or phone number for the conference coordinator.
Once all of the fields have been completed, by clicking on Add venues and attendees>> at the bottom of the page, users will move on to the second stage.
2.2.Conference Venues and Attendees
Figure 4 shows the ‘Conference venues and attendees’ page. At the top of the page is a summary of the details just entered, which may be changed if necessary.

Figure 4: Book a videoconference Step 2
Various types of participants can be added to the conference.
To see the various ways to include yourself in a meeting, click on the '[+]' symbol beside that option (figure 5). You can add yourself at your home venue, as a Janet desktop user or as a telephone participant. If you don't wish to participate in the conference you can ignore this option.

Figure 5: Including yourself as a conference participant
If you have booked conferences in the past, these will appear when you click on the '[+]' icon on the 'Add a frequently booked participant'. This will be empty for new users.
To add a guest, click on the '[+]' symbol beside that option (see figure 6).

Figure 6: add a guest
You can invite an IP, ISDN, SIP, Janet Desktop or a telephone participant.
IP guest - you will need to enter the guest name and (if known) the IP address or E.164 number. If these are not known you can tick the 'Address Unknown' (red-circled) box as shown in the image below. Enter the email address of your guest (see figure 6a).

Figure 6a: add an IP guest
ISDN guest - you will need to have the guest name and email address. If you know the ISDN number you can enter that. If you don't have the ISDN number for your guest, the booking system will issue a number that these people can dial in to. More information about ISDN accounts can be found by going to the related library page.
SIP guest - You will need the guest name, the SIP URI and the email address of your SIP participant (see figure 6b).

Figure 6b: add a SIP guest
Janet Desktop guest - the name of the participant, organisation and email address will be required (see figure 6c).

Figure 6c: add a Janet desktop guest
Telephone (audio only) guest - See figure 6d. The name of the participant and the email address are the only requirements. If the booker has an ISDN account then a telephone number can be added so that the participant can be called. See ISDN guest above for more details.
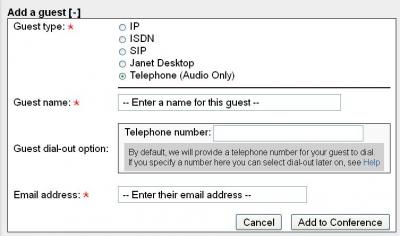
Figure 6d: add a telephone guest
1. Add Favourite. The ‘Add Favourite’ button allows users to add a venue to the booking from a list of favourite venues. If you haven’t added any venues to this list, the button will be shown greyed out.
2. Add Venue. The ‘Add Venue’ button will allow users to search for a venue using Simple or Advanced search options (Figure 7).

Figure 7: Simple search to select & add venue page
By default, the Simple option is highlighted and can be used if users know the full venue name or even just part of it.
The Advanced option has a number of search options (Figure 8):

Figure 8: Advanced search to select & add venue page
In either case, once a venue has been found, it can be highlighted and selected by clicking on Add to Conference; the venue will be added to the booking.
Some venues can only be booked if explicit permission has been given for a booking to be made. If any of the venues fall into this category, a ‘Prior arrangement required’ page will be displayed (Figure 9), to remind the booker of this. All venues requiring explicit prior arrangement to be booked by third parties will be listed, and, wherever possible, the Contact, Phone and Email details will appear alongside the venue name. If permission has not been received to make this booking, this should be done before proceeding. If permission has been given, tick the box to indicate this.

Figure 9: ‘Prior arrangement required’ message
2.3.Main Attendees
A list of venue names will appear on screen as venues are added (Figure 10). To the right of each venue name there is a box to which a Main Attendee name needs to be added. If a venue has been selected from a favourites list there may already be a name entered.

Figure 10: Main attendees and actions
There are two possible Actions associated with each venue (circled in red in figure 10), each with its own icon:
1. Clicking on  will add the venue to a Favourites List
2. Clicking on  will delete it from the conference.
2.4.Venue Resources
By clicking on View Venue Resources, located at the bottom of the list of venues, available resources for each venue may be seen, e.g. document cameras, number of seats, data sharing etc. This is shown in figure 11.

Figure 11: Venue resources
If a venue is available for the chosen conference time there will be a green tick next to the venue or if a venue is unavailable there will be a red cross.
If a venue has been chosen with a red cross next to it, users will be returned to the ‘Conference venues and attendees’ page with an option to check the venue availability (Figure 12).

Figure 12: Venue availability
In order for a conference to be booked, another time must be chosen when all venues are available or the unavailable venue must be removed.
Once all necessary venues have been selected and all details filled in, users should click on the Confirm conference booking button.
2.5.Confirm venues and attendees
When all of your attendees have been added, click on the Confirm venues and attendees button.
2.6.Confirm booking Step 3 of 3
The ‘Confirm Booking’ page (Figure 13) contains a summary of your conference details, enabling you to change anything that is incorrect.
More details about Optional Settings can be found by visiting the Optional Settings area of the Janet library.
If all details are correct, users just need to click on the Complete conference booking button at the bottom of the page.

Figure 13: Book a videoconference Step 3


